Thursday, 9 October 2014

Mini French Toast

Today I Made Mini French Toast


Just when you think french toast can’t get any better – try it in mini size. I love miniature versions of anything really but miniature versions of foods is just the best thing ever. Both fun to make and even more fun to eat! French toast isn't anything new or inventive, but when you use different shapes and sizes of bread – it all of a sudden becomes interesting again. For the record, french toast is always interesting to me. Comfort food at its finest. This dish is perfect for those lazy Saturday/Sunday mornings and a great way to use up any left over French Baguette. 


This recipe is ridiculously easy to prepare and make and always receives a great reception. These little guys are amazing covered in Maple Syrup or Nutella or jam or anything sweet and sticky. The ingredients for this recipe are very simple and are things that you would have in your press and fridge normally. The egg mixture can be made in advance and kept covered in the fridge over night and the bread works better when it is a day or two old so you can literally have all the work done from the day before and just wake up, fry and dive in.


Ingredients:


  • French baguette
  • 3 large eggs
  • 220mls Milk
  • 1/2 teaspoon ground cinnamon
  • 1-2 Tablespoons unsalted butter, for greasing the pan
  • Maple Syrup, Jam, Nutella
Directions:

1. Slice baguette into 1 - 1.5 inch slices. Set aside.  Crusty is key – make sure your baguette is nice and crisp. I let this loaf go stale for about 2 days before making the french toast. So, buy a loaf on Thursday for a Saturday or Sunday morning breakfast.


2. In a medium bowl, whisk the eggs, milk, and cinnamon together until combined. The mixture will be thick and creamy. Pour into a large bowl or jug. Make ahead: at this point, you can cover the mixture up tightly and refrigerate until the morning when you are ready to make french toast.


3. Soak the bread slices in the mixture for about 2 minutes on each side.


4. Meanwhile, over medium-low heat, melt 1 Tablespoon of butter in a pan. Place however many slices of bread fir into the pan and cook until gold brown on each side, about 3 minutes on each side.


5. Melt more butter in pan for the next batch, if needed.


6. Serve immediately with butter, maple syrup, Nutella, Jam and/or fruit.


"How do you like your eggs in the morning?"

Thursday, 21 August 2014

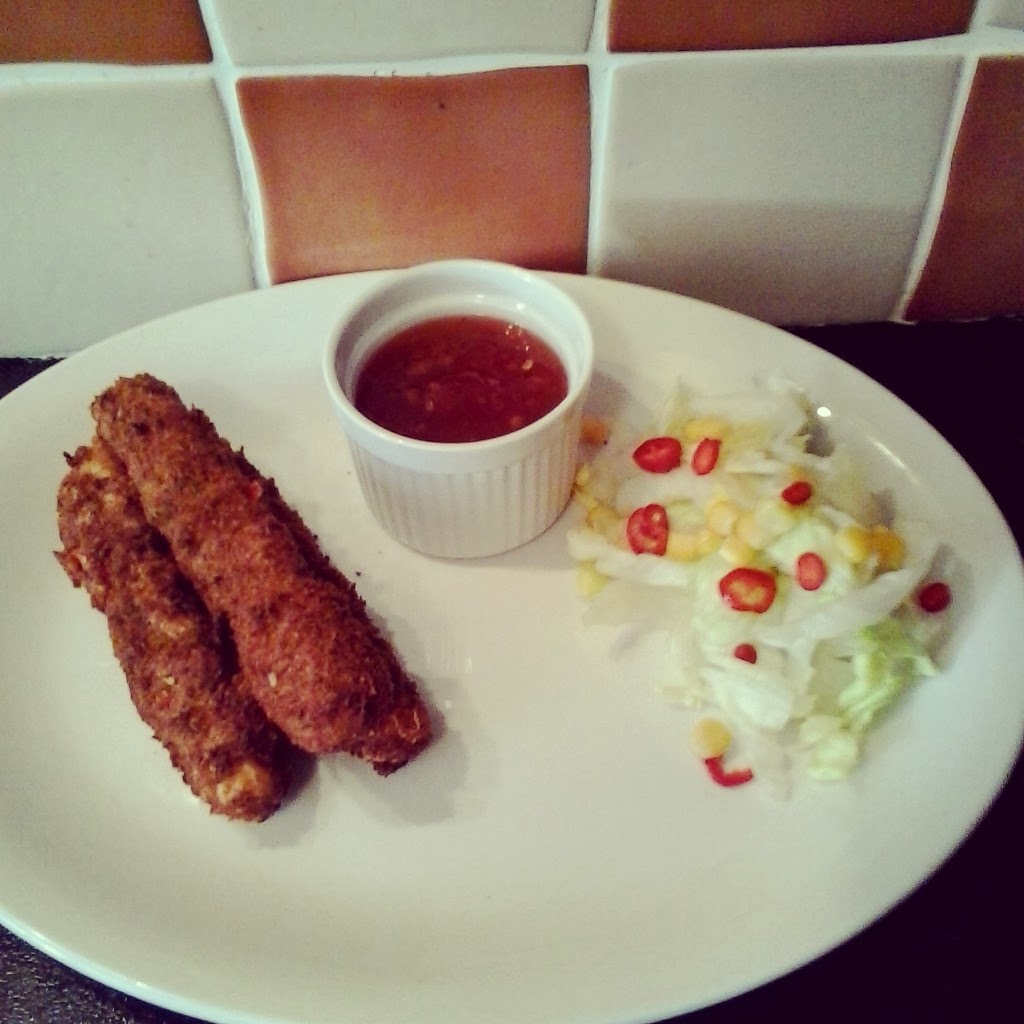
Sexy Cheese Sticks

Today I made Sexy Cheese Sticks

One of my favourite starters in the likes of TGI Fridays or Captain Americas are the mozzarella sticks. There's something so comforting about melted cheese coated in a crunchy lightly spiced crumb. It's almost like having some kind of abstract toasted cheese sandwich. When I first started making my own mozzarella sticks I was using mozzarella cheese and shaping it into the shape I was looking for then I started experimenting with different types of cheese, some would melt too much, some wouldn't melt at all and some weren't stringy, which is the most important feature of this dish, you want a good stringy cheese for visual effect as well the mouth feel. So I though what better cheese to use for a stringy effect than.... A cheese string.


In my eyes Cheese Strings are the perfect cheese to use for making cheese sticks, as they melt amazingly, are good and stringy and are already in the shape you want the cheese to be in. I use a number of different ingredients in the crumb for this dish as it really adds a depth of flavour as well as cutting through the taste of the cheese. The ingredients I use are Sea Salt and Black Pepper, Paprika, Garlic, Red Chili, Lime Zest and a small amount of my all time favourite Cajun Spice. The Chili and Paprika add a level of heat which really complement the heat of the melted cheese and the Lime Zest cuts through the heaviness of the cheese. The Garlic, Salt and Pepper add a delicious base for which the other ingredients build.


Ingredients:
(Makes 8) 
  • 8 Cheese Strings
  • 3 Slices of White Bread
  • 1 Medium Red Chili 
  • Zest of 1 Lime
  • 2 Cloves of Garlic - Crushed
  • 1 Large Egg
  • 60g OO' Flour
  • 1 Teaspoon Paprika
  • 1 Teaspoon Cajun Spice
  • Pinch of Salt and Black Pepper


Instructions: 

1.Blitz the three slices of bread in a food processor to make the breadcrumbs, finely slice the Red Chili, Crush the Garlic Cloves and Zest the Lime and add into the the breadcrumbs. Season with Salt and Pepper.


2. Unwrap the Cheese Strings and lay out ready to crumb.


3. Set up your crumbing station by putting out three dishes. In the first dish place the OO' Flour and a pinch of salt, in the second crack and whisk the Egg and in the third place the seasoned Flour.


4. Place a Cheese String into the seasoned Flour and toss till coated, then place into the beaten Egg mixture. 


5. Place the Cheese straight from the Egg mixture straight into the breadcrumb mixture and  coat fully. You can repeat the Flour, Egg, Breadcrumb process again if you want a slightly thicker crumb. I normally do the process twice. 


6. Repeat the Process to the rest of the Cheese Strings and set out on a plate ready to be fried. Heat a large pan of oil to a medium in which you can fry the Cheese Strings.


7. Fry each Cheese String for 3-6 minutes or until golden brown. Serve the Crispy, Stringy Cheese Sticks with a Salad of choice and Sweet Chili Sauce for dipping. Serve while still warm.


"No Strings attached"

Saturday, 8 March 2014

Peanut Butter Jelly Time Cupcakes

Today I made Peanut Butter Jelly Time Cupcakes

One of the most popular flavour combinations in... life has to be Peanut Butter and "Jelly". Made famous by America and soon adopted by sandwich makers everywhere. Also with thanks to the"Peanut Butter Jelly Time" song popularised by "Family Guy" and numerous Youtube videos. A 2002 survey showed the average American will have eaten 2,500 Peanut Butter and Jelly sandwiches before graduating from high school. Peanut Butter is a great source of protein and also gives these Cupcakes an amazing texture along with a depth of flavour. I have tried this recipe with smooth and chunky Peanut Butter and different types of Jams and I find using chunky Peanut Butter and Strawberry Jam gives the best results.


Ingredients:

(Makes 12) 

For the Cupcakes:
  • 150g Self-Raising Flour
  • 1/4 Teaspoon Salt
  • 85g Chunky Peanut Butter
  • 150g Unsalted Butter, softened 
  • 100g Golden Caster Sugar
  • 2 Large Eggs
  • 1 Teaspoon Vanilla Extract
  • 3 Tablespoons Milk
  • 12 Teaspoons of Strawberry Jam 
  • 2-3 Tablespoons Oil

For the Frosting:
  • 250g Icing Sugar 
  • 180g Softened Butter 
  • 50g Strawberry Jam
Instructions:

1. Preheat the oven to 180°C. Using a pastry brush, brush the cupcake tin with a little Oil to ensure the Cupcakes don't stick.


2. Mix together the sieved flour, salt and baking powder and set aside. Cream together the peanut butter, sugar and butter until light and fluffy- you can do this with a handheld mixer or stand mixer but I normally just do it by hand with a whisk or wooden spoon. 


3. Beat in the eggs one at a time, making sure to mix thoroughly after each addition. When the eggs are fully incorporated you can add in the vanilla extract and mix. I normally beat in the eggs with a wooden spoon as I feel a whisk can agitate the eggs a little too much and may lead to heavy cupcakes


4. Slowly Beat in the Flour mixture alternatively with the milk mixing till just combined, ensure not to over-mix as this will lead to heavy dry cupcakes. Adding a little flour then milk ensure that the mixture doesn't get too thick or thin during the mixing process. The mixture should be light in colour.


5. Divide the mixture evenly between the 12. I normally use an ice-cream scooper to divide out the mixture. That way you get the exact same amount in each case so your cupcakes will all be the same size which is handy as they will all be cooked at the same time. 


6. Using the back of a small spoon make a small hole in the mixture of each Cupcake and place a teaspoon of Jam in each hole. 


7.  Bake for 23-25 minutes. Allow to cool completely on a wire rack before frosting. I have been known to place the cupcakes into the fridge to assist the chill process if I'm too excited and can't wait to frost them.


8. For the frosting, sift together the Icing Sugar so that there are no lumps, set aside. Beat the butter by itself for a minute until it is soft and fluffy then slowly add in the Icing Sugar. Then beat in the jam.


9. Ice the Cupcakes using a piping bag, piping gun or using a spatula. I like to cut the Cupcakes in half if I'm serving them as you can see the jam ooze out of them. 


"Peanut butter jelly with a baseball bat"

Sunday, 2 March 2014

Rolo Stuffed Cookies

Today I made Rolo Stuffed Cookies

I always loved the idea of stuffing Cookies. A Cookie in itself is pretty amazing but then to have something secret inside just blows my mind. I've experimented with a number of different things but I found that the Rolo works the best. I love the idea of Chocolate and Caramel together and wanted to bake a Cookie with these two components, I tried adding Chocolate and Caramel separately but I found the Cookie to be very messy. I found stuffing the Cookie with a Rolo gave the perfect desired effect I was looking for. The Cookie soft and chewy with a gooey Chocolate and Caramel center when they are still warm from the oven. Then as they cool they center turns chewy. Just perfect! 

Ingredients:
(Makes 12 Large) 

  • 170g Unsalted Butter
  • 150g Golden Sugar
  • 50g Granulated Sugar
  • 1 Large Egg - At room temperature
  • 2 Teaspoons Vanilla Essence 
  • 250g All purpose Flour
  • 2 Teaspoons Cornstarch
  • 1 Teaspoon Baking Soda
  • 12 Rolos 
Instructions:


1. Preheat oven to 160°C. Line two baking trays with baking parchment or silicone baking mats.

2. In a large bowl cream the butter and Golden and Granulated Sugar together, you can do this by hand with a spatula or whisk or with a hand held mixer until light and fluffy. Mix in the egg and vanilla and mix again until fully incorporated.


3. Scrape down the sides of the bowl when needed. When the egg and vanilla are incorporated you can start to add in the Flour, Baking Soda and Cornstarch . I like to put all the dry goods into a sieve together so everything gets incorporated evenly.


4. Mix thoroughly with a spatula until it forms a ball of dough. Place Cookie Dough into a small bowl and chill for half an hour.


5.  When the Cookie Dough has chilled you're ready to assemble the cookies. Take a small amount into your hand and roll it into a ball.


6.Place one chilled Rolo into the center of the ball of Cookie Dough and press it down slightly. Mold the Cookie Dough around the Rolo.


7. Roll another smaller ball of Cookie Dough. This will cover the top of the Rolo and ensure the chocolate doesn't escape during baking.


8.Make sure you press down the Cookie Dough to ensure the Chocolate doesn't escape. Use the palms of your hands to even out the sides of Cookies.


9. Place the Cookies onto a baking tray and place into the fridge to firm up - They will be quite soft after handling them during assembly.


10. Bake for 7-8 minutes, until the cookies are just starting to go golden brown around the edges. I really recommend not cooking any longer than 9 minutes. The cookies may seem slightly underdone but they will continue to bake on the baking sheet for a few minutes.

11. Remove from the oven and leave to cool for 5-10 minutes, then transfer to a wire wrack.


"They see me Rolo'n, they hatin'"

Friday, 28 February 2014

Sesame and Pumpkin Seed Bagels

Today I made Sesame and Pumpkin Seed Bagels
I don't use the word magical lightly, but there really is something wondrous about making bagels at home. Maybe it's the shape. I think everyone understands a loaf of bread, but the round shape with a hole ... well, it seems like a whole lot more work than simply plopping some dough in a loaf pan. But it's not. Really. Try making just one batch of these, and I'm sure you'll have the process down. And while a plain homemade bagel is still plain magical, adding toppings is Gandalf fighting the Balrog magic. It's real level-up stuff, folks. Get your shape just right and lay down a variety of toppings, and people will not believe you made them. For this recipe I use Sesame Seeds and Pumpkin but you can fee free to top these beauties however you see fit.


Ingredients:
(Makes 10) 
  • 450g Strong Bread Flour 
  • 2 Tablespoons Salt 
  • 250mls Warm Water 
  • 7g Sachet Fast Acting Yeast 
  • 2 Tablespoons Clear Honey 
  • 1 Tablespoon Vegetable Oil 
  • 1 Egg White, beaten 
  • Sesame Seeds 
  • Pumpkin Seeds 
  • 1 Tablespoon Bicarbonate of Soda

Instructions:

1. Sift the flour and salt into a large mixing bowl and leave to one side. 


2. Measure 250ml/9fl oz Warm Water in a measuring jug and then stir in the honey and oil and yeast. Leave for five minutes to allow the yeast to start to activate. Make a well and pour into Flour mixture.

3. Bring the dough together with your hands. Turn the dough out onto a clean, dry and floured work surface. Start kneading the dough, stretching it away with the palm of one hand and folding it back again with the other.


4.  Knead for approximately 10 minutes, adding more flour if the dough becomes too sticky. Continue kneading until the dough is firm and elastic. Place in an oiled bowel and cover with cling film. Place in a warm dark warm place for 45-60 minutes.


5. The dough will have doubled in size and small bubbles with be visible within the dough. The yeast will have metabolised the sugars in the honey and produced Carbon Dioxide. This causes the dough to rise.


6. You need to knock back the dough then place it on to a floured surface and knead for 2-3 minutes. Roll into a long even sausage shape. 


7. Using a dough cutter or sharp knife cut the dough into 10 even sections. I normally weigh each part to make sure they are all roughly the same size. Mine were in and around 80g. 


8. Roll each slice into a perfectly round ball, trying to avoid any cracks or unevenness. 


9. Place the dough balls on to two oiled baking sheets that are lined with baking parchment or a baking mat. Cover loosely in an oiled piece of cling film and place back into your dark, warm palce for 15-20 minutes. 


10. The dough balls will have risen again slightly. Place them onto a floured surface at three or four at a time. 


12. Using a floured finger press down into the center of each dough ball and move your finger around slightly to form the ever important Bagel hole. 


13. In a large pan of boiling water place the tablespoon of Bicarbonate of Soda and stir through. Place the Bagels into the boiling water three or four at a time and cook for 2-4 minutes, flipping them half way through - The longer you leave them simmer the chewier your Bagel. I like mine slightly on the chewier side so I give them two minutes on each side.


14. Remove the Bagels from the water and pat dry on either side with kitchen town to remove any excess water. Place back on the oiled baking trays.


15. Beat the Egg White and get your Seeds of choice ready. Using a pastry brush, coat the Bagels in the Egg White. Then generously cover each one with the seeds. Adding as much or as little as you like.


16. Bake in a preheated oven at 200C for fifteen minutes until golden brown then turn them upside down for a further ten minutes to cook the bases. Transfer to a wire rack to cool before serving.


"Baking Bread"