Showing posts with label Dough. Show all posts

Friday, 28 February 2014

Sesame and Pumpkin Seed Bagels

Today I made Sesame and Pumpkin Seed Bagels
I don't use the word magical lightly, but there really is something wondrous about making bagels at home. Maybe it's the shape. I think everyone understands a loaf of bread, but the round shape with a hole ... well, it seems like a whole lot more work than simply plopping some dough in a loaf pan. But it's not. Really. Try making just one batch of these, and I'm sure you'll have the process down. And while a plain homemade bagel is still plain magical, adding toppings is Gandalf fighting the Balrog magic. It's real level-up stuff, folks. Get your shape just right and lay down a variety of toppings, and people will not believe you made them. For this recipe I use Sesame Seeds and Pumpkin but you can fee free to top these beauties however you see fit.


Ingredients:
(Makes 10) 
  • 450g Strong Bread Flour 
  • 2 Tablespoons Salt 
  • 250mls Warm Water 
  • 7g Sachet Fast Acting Yeast 
  • 2 Tablespoons Clear Honey 
  • 1 Tablespoon Vegetable Oil 
  • 1 Egg White, beaten 
  • Sesame Seeds 
  • Pumpkin Seeds 
  • 1 Tablespoon Bicarbonate of Soda

Instructions:

1. Sift the flour and salt into a large mixing bowl and leave to one side. 


2. Measure 250ml/9fl oz Warm Water in a measuring jug and then stir in the honey and oil and yeast. Leave for five minutes to allow the yeast to start to activate. Make a well and pour into Flour mixture.

3. Bring the dough together with your hands. Turn the dough out onto a clean, dry and floured work surface. Start kneading the dough, stretching it away with the palm of one hand and folding it back again with the other.


4.  Knead for approximately 10 minutes, adding more flour if the dough becomes too sticky. Continue kneading until the dough is firm and elastic. Place in an oiled bowel and cover with cling film. Place in a warm dark warm place for 45-60 minutes.


5. The dough will have doubled in size and small bubbles with be visible within the dough. The yeast will have metabolised the sugars in the honey and produced Carbon Dioxide. This causes the dough to rise.


6. You need to knock back the dough then place it on to a floured surface and knead for 2-3 minutes. Roll into a long even sausage shape. 


7. Using a dough cutter or sharp knife cut the dough into 10 even sections. I normally weigh each part to make sure they are all roughly the same size. Mine were in and around 80g. 


8. Roll each slice into a perfectly round ball, trying to avoid any cracks or unevenness. 


9. Place the dough balls on to two oiled baking sheets that are lined with baking parchment or a baking mat. Cover loosely in an oiled piece of cling film and place back into your dark, warm palce for 15-20 minutes. 


10. The dough balls will have risen again slightly. Place them onto a floured surface at three or four at a time. 


12. Using a floured finger press down into the center of each dough ball and move your finger around slightly to form the ever important Bagel hole. 


13. In a large pan of boiling water place the tablespoon of Bicarbonate of Soda and stir through. Place the Bagels into the boiling water three or four at a time and cook for 2-4 minutes, flipping them half way through - The longer you leave them simmer the chewier your Bagel. I like mine slightly on the chewier side so I give them two minutes on each side.


14. Remove the Bagels from the water and pat dry on either side with kitchen town to remove any excess water. Place back on the oiled baking trays.


15. Beat the Egg White and get your Seeds of choice ready. Using a pastry brush, coat the Bagels in the Egg White. Then generously cover each one with the seeds. Adding as much or as little as you like.


16. Bake in a preheated oven at 200C for fifteen minutes until golden brown then turn them upside down for a further ten minutes to cook the bases. Transfer to a wire rack to cool before serving.


"Baking Bread"

Sunday, 27 October 2013

M&M Cookies

Today I made M&M Cookies

Want something yummy but don't fancy just any cookie. This recipe is super easy and perfect to help you use up the extra candy that might be hanging around after Halloween. I don't know what it is but I always seem to have an abundance of M&M's after Halloween even if I didn't buy any they just appear in my house. My Nieces and Nephews always love these Cookies. They're very colourful and really soft and chewy and that contrasted with the crunch of the shell of the candy. If you eat them warm the Chocolate inside the shell is still melted so it's like little pockets of chocolate sauce within the cookie. These cookies act as perfect wafer for ice-cream also. A scoop of Vanilla ice-cream in between two Cookies makes a perfect dessert.

I like to use the regular M&M's in this recipe but I have used the Peanut M&M's in the past and I plan on using the Crispy ones in the future. I always pick M&M's over smarties for recipes like this. I feel the Chocolate melts better and the colours don't seem to run as much during baking. These Cookies use my basic Soft and Chewy Cookie Recipe. I use more Golden Sugar than White Sugar in this recipe. Golden Sugar gives the cookie a much softer, chewier and moist consistency while the White Sugar induces spreadying so the Cookie will end up both soft and thick as well as being big in size. It's important to use both Sugars in today's recipe. I plan on using White Chocolate Chips the next time I make these. 


Ingredients:
(Makes 12 Large) 

  • 170g Unsalted Butter
  • 150g Golden Sugar
  • 50g Granulated Sugar
  • 1 Large Egg - At room temperature
  • 2 Teaspoons Vanilla Essence 
  • 250g All purpose Flour
  • 2 Teaspoons Cornstarch
  • 1 Teaspoon Baking Soda
  • 200g M&M's 

Instructions:

1. Preheat oven to 160°C. Line two baking trays with baking parchment or silicone baking 
mats.

2. In a large bowl cream the butter and Golden and Granulated Sugar together, you can do this by hand with a spatula or whisk or with a hand held mixer until light and fluffy. Mix in the egg and vanilla and mix again until fully incorporated.


3. Scrape down the sides of the bowl when needed. When the egg and vanilla are incorporated you can start to add in the Flour, Baking Soda and Cornstarch . I like to put all the dry goods into a sieve together so everything gets incorporated evenly. 

4. Stir in the M&M's and mix through so that they are evenly dispersed throughout the Cookie Dough. 


5. Chill the dough in the fridge for at least half an hour, I normally leave it for an hour as the longer you leave the dough the better the texture of the Cookies. The dough can also be chilled for up to three days or in the freezer for three months. 

6. When the dough is chilled, take out of the fridge. Take up two Tablespoons of the mixture and roll into a ball in your hands. Place the balls of dough on the baking trays with a 2 inch gap in between them.

7. Bake for 8-9 minutes, until the cookies are just starting to go golden brown around the edges. I really recommend not cooking any longer than 9 minutes. The cookies may seem slightly underdone but they will continue to bake on the baking sheet for a few minutes.

8. Remove from the oven and leave to cool for 5-10 minutes, then transfer to a wire wrack.


"Chocolate is nature’s way of making up for Mondays."

Gluten Free Breakfast Cookies

Today I made Gluten Free Breakfast Cookies

Some mornings all I want for breakfast is a Cookie and cup of tea but also want to have something at least a little bit healthy. Faced with this problem I had to do some research into what I could make to satisfy both these needs. I love the idea of Granola and throwing lots of healthy ingredients together and I love cookies so I thought what If I could combine the two? These Breakfast Cookies are ridiculously easy make. All you need is one bowl and your choice of healthy ingredients and the determination not to eat all of the mix before you make them into cookies. These are not only perfect for Breakfast. The Complex carbs from the Oats fuel amazing work outs, try one before hitting the gym. 


These Cookies start with a base of Gluten Free Quick Oats. I choose to use Gluten Free Oats for an extra Health Kick. I try to go Gluten Free whenever I can get away with it with my baking and this recipe is perfect for it. You need to use Quick Oats in this recipe, The Quick Oats are more powdery than Whole Oats which will give the Cookies more structure. Another must in these cookies is the Peanut Butter, I like to use Chunky Peanut Putter to give these Cookies a nice crunchy texture. I also like to add Apple Sauce and the Cookies are sweetened with a small amount of Maple Syrup or Honey. The add-ins can include Dried Cranberries, Raisins, Pumpkin Seeds, Sesame Seeds, Honey Roasted Peanuts, Pecans, Sunflower Seeds and Chocolate Chips.


Ingredients: 
(Makes 12)

  • 180g Quick Oats
  • 80g Chunky Peanut Butter
  • 40g Maple Syrup (or honey)
  • 30g Apple Sauce
  • 40g Chocolate Chips
  • 40g Raisins
  • 0g Coconut
  • 40g Sesame Seeds 
Instructions:

1. Preheat oven to 180°C. Line a large Cookie sheet with parchment paper or a silicone baking mat. Set aside.

2. Combine all the ingredients in a large bowl using a wooden spoon. Mix until all the ingredients are combined. The dough should look quite stiff.


3. Take a large Tablespoon of the mixture and roll around between the palm of your hands and form into a ball. Place onto prepared cookie sheets. Slightly flatten the tops of the cookie dough, the cookies will not spread in the oven so press into the shape you wish them to have. 


4. Bake for 14-16 minutes or until the edges are slightly browned. Allow to cool fully on the cookie sheets before transferring to a wire rack. 

5. Cookies will stay fresh in an air tight container at room temperature for one week. You can also freeze these cookies for up to 3 months. 


"Got Milk?"

Saturday, 12 October 2013

Cinnamon Rolls with Vanilla Glaze


Today I made super easy Cinnamon Rolls  

I have always had a weak spot for Cinnamon Rolls ever since I was a child.  My father would bring me in to town and we'd always have tea and share a Cinnamon Roll so to this day when I smell that sweet Cinnamon aroma it takes me right back to being that five year old girl. A number of years ago I started to notice that not many places sold Cinnamon Rolls anymore so I was faced with a dilemma - how was I going to get my fix now? So I started to look into making my own. The first couple of recipes I tried hit a miss, I was so familiar with how my memory wanted them to taste that I couldn't settle. I started playing around with putting together my own recipe and then one day everything fell into to place as I finally cracked it.


 Not only is this recipe really easy to make, they look like fluffy little spiraled pillows.  All nice & toasty and they just happen to taste amazing. These little guys are perfect for breakfast on a lazy Sunday morning, yummy Saturday brunch or naughty weekday afternoon tea. They come out of the oven hot, you load them with your frosting of choice, throw them on the table and everybody can tear off what they want. You can fill these rolls with Nuts, Jam, Nutella, Coconut or Mixed Fruit. I have a number different recipes that I will share with you .


Ingredients:

For The Rolls:
  • 350g All Purpose Flour
  • 3 Tablespoons Granulated Sugar
  • 7g Dried Yeast
  • 60mls Milk
  • 120mls Water
  • 40g Butter
  • 1 Large Egg
For The Filling:
  • 60g Unsalted Butter - softened to room temperature
  • 1 and 1/2 Tablespoons Ground Cinnamon
  • 100g Granulated Sugar

For The Glaze:
  • 150g Icing Sugar
  • 2 Teaspoons Vanilla Extract
  • 2 Tablespoons Milk

Instructions:

For The Dough:
1. Sift the Flour into a large bowl. Add in the sugar and yeast and mix until evenly dispersed. Set Aside while you prepare the wet ingredients.


2. Heat the water, milk and butter together in the microwave until the butter is melted, it normally takes me 40-50 seconds. Stir the butter mixtures into the flour mixtures. Add the Egg and bring together with your fingers until it forms a soft dough.


3. The dough is ready when it gently pulls away from the side of the bowl and starts to feel smooth and springy. 


4. On a lightly floured surface, knead the dough for about 4-5 minutes. Place in a lightly oiled bowl and leave to rest for 10 minutes. I do all my dough proofing  in my dryer - I know it sounds mad but I normally put on the dryer while I make the dough when the dough is ready I turn off the dryer and place the bowl into the dryer with a damp clean tea towel over it.


For The Filling:
5. After 10-15 minutes, roll the dough out into a 14x8 inch rectangle. Once rolled out spread the butter on top, mix together the Cinnamon and Sugar and sprinkle it all over the dough, right out to the edges.


6. Roll up the dough tightly. Cut into 12 even pieces, press down slightly on each swirl before placing into a a lightly oiled 9 inch round pan. I like to use a clasp release pans so its easy to get them out in one piece.


7. Loosely cover the rolls with cling film and allow to rise in a warm and dry place for an hour. After the rolls have doubled in size, preheat the oven to 190°C. Bake for 20-25 minutes until lightly golden brown. I normally cover the rolls with tin foil after 15 minutes of baking as I don't like them getting too brown. 


For The Glaze:
8. Mix the Icing Sugar with the Milk and Vanilla Extract, you don't want the the glaze too runny so it doesn't run right off the Cinnamon Rolls. Completely drench your Cinnamon Rolls with your Glaze and devour.


“Ask not what you can do for your country. Ask what’s for  breakfast.”

Sunday, 29 September 2013

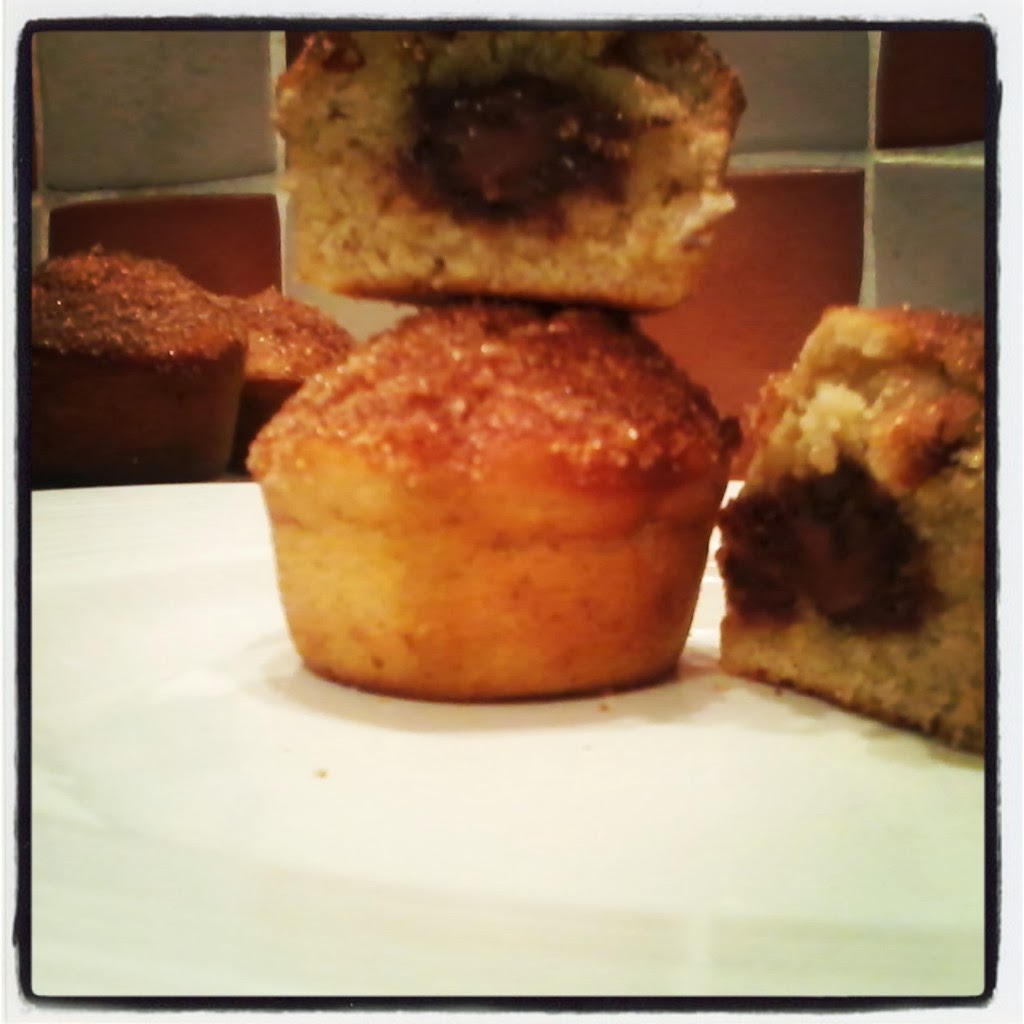
Nutella-Stuffed Sugar and Cinnamon Cupcakes

Today I made Nutella-Stuffed Sugar and Cinnamon Cupcakes


Do you love Doughnuts? Do you love Nutella? Do you love Cinnamon? Then you are going to love these. These little cakes taste like a cross between a doughnut and a cinnamon swirl. I used to make these cakes with just the sugar and cinnamon crust then one day I wanted to give them a quirky edge, that's where the Nutella came in. They are such a comforting treat with a cup of tea or cold glass of milk. Perfect for breakfast, as a dessert, as a lunchbox filler or as a naughty midnight snack. They are perfect for any occasion those all too well known chocolate/sugar cravings hit. Making these muffins is so easy. It only takes about 30 minutes from bowl to belly


.This is one of my favourite kind of recipes as all the ingredients are all mixed in one bowl. Any recipe that reduces the amount of dishes that have to be washed are favoured in my house. When you have these beauties waiting for you the last thing you want to do is face a sink full of dirty dishes. The texture of these cupcakes are so similar to that of a doughnut I often have people questioning are they really cupcakes. The Sugar and Cinnamon not only makes them look pretty but adds a crunch that really contrasts the softness of the cupcake.


Ingredients:
(Makes 6 large)

For The Cupcakes:
  • 80g Unsalted Butter, at room temperature
  • 100g Granulated Sugar
  • 1 Large Egg
  • 1 Teaspoon Vanilla Extract
  • 120mls Milk
  • 200g All Purpose Flour
  • 1 1/2 Teaspoons Baking Powder
  • 1/2 Teaspoon Cinnamon
  • 1/4 Teaspoon Nutella
  • 8 Teaspoons Nutella
For The Topping:
  • 1/4 Cup Granulated Sugar
  • 2 Teaspoons Cinnamon
  • 4 Tablespoons Melted Butter

Instructions:

1. Preheat the oven to  180°C. Spray muffin tin with an oil spray and set aside.

2. In a large bowl cream the butter and sugar together until light and fluffy. Mix in the Eggs,    Vanilla Extract and milk. Gently fold in the flour, baking powder, cinnamon and nutmeg.    Don't over mix, just stir together until everything is combined. 


3. Half fill each tin with the mixture. Layer with 1 tablespoon of Nutella in the center then top with another heaped teaspoon of batter on top. You can fill the cupcake tins right up to the top they won't overflow. I normally get 6 out of this mixture but can be easily doubled.


4. If you are using a 12 tin cupcake tin, I normally fill one of the empty tins with water to create some steam during cooking. This helps the cupcakes have really soft texture and even baking.

5. Bake at  180°C for five minutes. Reduce the oven to 160°C bake for a further 15 minutes until the cupcakes are golden brown. Allow to cool for five minutes.


6. While the cupcakes are cooling you can make the sugar cinnamon topping. Melt the butter in the microwave. In a separate small bowl stir together the sugar and cinnamon.


7. I normally use a pastry brush to brush the top of each cupcake with the melted butter then dip the top of each in the sugar and cinnamon mix. I normally swirl it around to ensure I get a nice thick coating.


“I love you like a fat kid loves cake!”