Showing posts with label Cookies.. Show all posts

Sunday, 27 October 2013

Gluten Free Breakfast Cookies

Today I made Gluten Free Breakfast Cookies

Some mornings all I want for breakfast is a Cookie and cup of tea but also want to have something at least a little bit healthy. Faced with this problem I had to do some research into what I could make to satisfy both these needs. I love the idea of Granola and throwing lots of healthy ingredients together and I love cookies so I thought what If I could combine the two? These Breakfast Cookies are ridiculously easy make. All you need is one bowl and your choice of healthy ingredients and the determination not to eat all of the mix before you make them into cookies. These are not only perfect for Breakfast. The Complex carbs from the Oats fuel amazing work outs, try one before hitting the gym. 


These Cookies start with a base of Gluten Free Quick Oats. I choose to use Gluten Free Oats for an extra Health Kick. I try to go Gluten Free whenever I can get away with it with my baking and this recipe is perfect for it. You need to use Quick Oats in this recipe, The Quick Oats are more powdery than Whole Oats which will give the Cookies more structure. Another must in these cookies is the Peanut Butter, I like to use Chunky Peanut Putter to give these Cookies a nice crunchy texture. I also like to add Apple Sauce and the Cookies are sweetened with a small amount of Maple Syrup or Honey. The add-ins can include Dried Cranberries, Raisins, Pumpkin Seeds, Sesame Seeds, Honey Roasted Peanuts, Pecans, Sunflower Seeds and Chocolate Chips.


Ingredients: 
(Makes 12)

  • 180g Quick Oats
  • 80g Chunky Peanut Butter
  • 40g Maple Syrup (or honey)
  • 30g Apple Sauce
  • 40g Chocolate Chips
  • 40g Raisins
  • 0g Coconut
  • 40g Sesame Seeds 
Instructions:

1. Preheat oven to 180°C. Line a large Cookie sheet with parchment paper or a silicone baking mat. Set aside.

2. Combine all the ingredients in a large bowl using a wooden spoon. Mix until all the ingredients are combined. The dough should look quite stiff.


3. Take a large Tablespoon of the mixture and roll around between the palm of your hands and form into a ball. Place onto prepared cookie sheets. Slightly flatten the tops of the cookie dough, the cookies will not spread in the oven so press into the shape you wish them to have. 


4. Bake for 14-16 minutes or until the edges are slightly browned. Allow to cool fully on the cookie sheets before transferring to a wire rack. 

5. Cookies will stay fresh in an air tight container at room temperature for one week. You can also freeze these cookies for up to 3 months. 


"Got Milk?"

Monday, 9 September 2013

Chewy Cranberry and White Chocolate Cookies


Today I made Cranberry and White Chocolate Cookies

These cookies like my "Chocolate Chip Cookies" are melt in the mouth. Having problems making your cookies super soft, thick and chewy is a thing of the past. The addition of Cornstarch to your cookies dough is the answer to all your Cookie Woes. Think about it, Cornstarch is often used to thicken sauces and soups, it only makes sense it would do the same to Cookies. The lack of high levels of Gluten will mean the texture of your cookies and cakes are much lighter. The most important thing about these cookies is the Baking Time. Take the cookies out of the oven after 8/9 minutes, I normally don't leave the kitchen while they are baking as one or two minutes over and the cookies will lose the texture you're looking for. The cookies will appear soft and underdone when you take them out but they will continue to cook for 3-4 minutes on the baking sheets. I normally leave them rest of the baking sheets for 8 minutes so they can firm up slightly and start to cool down before moving them to a wire wrack.


There are certain food combinations that are just meant to be and White Chocolate and Cranberries are definitely one of them. Those tangy little berries are truly the soul mates of sweet, creamy White Chocolate. It's a spin off of the typical Sweet'n'Sour combination that we are so familiar with. Each bite hits you with a zingy burst as you bite down on a Cranberry then you are soothed by the sweetness of the White Chocolate. White Chocolate is my favourite add-in to nearly all of my baked goods but especially in cookie Recipes. Cranberries not only add a great texture and flavour but also a burst of colour. I always think of Cranberries as the pretty sister in the dried fruit family. Ardkeen Quality Food Store have an impressive Dried fruit and Nuts section including dried Cranberries, Raisins, Sultanas, Crystalised Ginger and a wide variety of different nuts which feature a lot in my baking.


Ingredients:
(Makes 24) 
  • 170g Unsalted Butter
  • 150g Light Brown Sugar
  • 50g Granulated Sugar
  • 1 Large Egg - At room temperature
  • 2 Teaspoons Vanilla Essence 
  • 250g All purpose Flour
  • 2 Teaspoons Cornstarch
  • 1 Teaspoon Baking Soda
  • 100g Dried Cranberries
  • 100g Callebaut White Chocolate Chips
Instructions:

1. Preheat oven to 160°C. Line two baking trays with baking parchment or silicone baking 
mats.


2. In a large bowl cream the butter and sugars together, you can do this by hand with a spatula or whisk or with a hand held mixer until light and fluffy. Mix in the egg and vanilla and mix again.


3. Scrape down the sides of the bowl when needed. When the egg and vanilla are incorporated you can start to add in the flour, Cornstarch and Baking Soda. I normally put all the dry goods into a sieve together so everything gets incorporated evenly. 

4. Stir in the white chocolate chips and Cranberries. I normally add in half of each first and work that in before adding the remainder. Try to evenly disperse the White Chocolate and Cranberries so that every cookie will get little of everything. 


5. Chill the dough in the fridge for at least half an hour, the dough can also be chilled for up to three days in case you need to make it ahead of time. 


6. When the dough is chilled, take out of the fridge. Take up about 11/2 teaspoons of the cookie dough and roll into a ball in your hands. Place the balls of dough on the baking trays with a 1 inch gap in between them. Press down slightly on each to flatten the top and bottom. 


7. Bake for 8-9 minutes, until the cookies are just starting to go golden brown around the edges. I really recommend not cooking any longer than 9 minutes. Remove from the oven and leave to cool for 5-10 minutes, then transfer to a wire wrack.


"Chocolate Doesn't ask questions. Chocolate understands."

Saturday, 31 August 2013

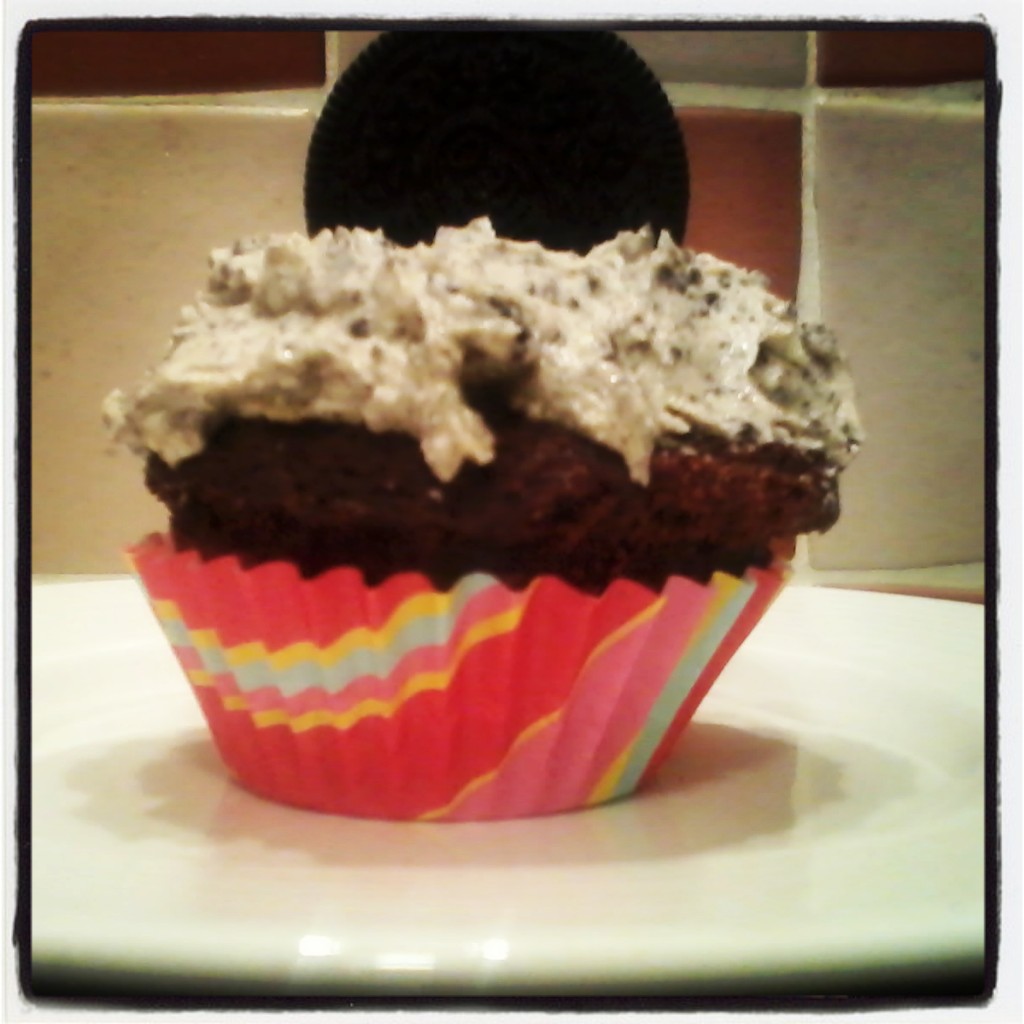
Oreo Cupcakes with Cookie Frosting


Today I made Oreo Cupcakes with Cookie Frosting


Young or Old, everybody seems to have a weak spot for the Oreo. In the Cookie World they tend to come in at a League Of Their Own. Whether you're a "Twist, Lick and Dunk" kinda person or a "Eat as many as you can before people find out you have cookies" kinda person the obsession is equally as high. When I first decided to play around with adding them to my cupcake recipe I got excited but wasn't sure how they would turn out. At first I just made a regular chocolate cupcake and used crushed up Oreo Cookies in the frosting and that was all. Since then this recipe has developed and is now even more filled with the rich Oreo goodness.


In my new and improved recipe I add an extra Oreo Cookie on the bottom of each Cupcake for a crunchy surprise as well as a great visual. And another on top, well just for good measure. When I give these Cupcakes out to people they tend to use the top Oreo as some kind of cookie spoon to eat the frosting, which I think is brilliant. The cupcake itself is quite light and fluffy and almost melts in the mouth, with a creamy vanilla frosting with speckles of Oreo dust, glistening like some kind of Cookie gold. The Chocolate I use in this recipe is Wilkies Organic Batch Chocolate, An Irish company all made by hand from Bean to Bar. Newly being stocked at Ardkeen Quality Food Store. You can really taste the difference and I'd highly recommend.


Ingredients:
(Makes 12)
For the Cupcake:
115g Unsalted Butter
45g Cocoa Powder
50g Wilkie's Chocolate -Amazonas
95g All Purpose Flour
1/2 Teaspoon Baking Soda
3/4 Teaspoon Baking Powder
1/4 Teaspoon Salt
2 Large Eggs - Room Temperature
100g Caster Sugar
50g Light Brown Sugar
1 Teaspoon Vanilla Extract
100mls Milk
24 Oreo Cookies

For the Frosting:
250g Icing Sugar
150g Unsalted Butter - Room Temperature
6 Oreo Cookies

Instructions:

1. Preheat the oven to 180°C. Line your cupcake tin with cases of your choice.

2. Melt the Butter and Chocolate together in the microwave. Heat in 30 second increments, stirring between each time. You can do this step over a bowl of boiling water on the cooker but It's easier and faster in the microwave. Stir in Vanilla Extract. 


3. In a large bowl, toss the Flour, Cocoa Powder, Baking Powder, Baking Soda and Salt until fully combined. In another bowl whisk the Eggs, Brown Sugar and Sugar until smooth. Add the cooled chocolate/butter mixture and whisk until smooth.

4. Add half the flour mixture, then half the milk. Repeat and then mix everything one last time. Don't over mix the batter as it leads to tough cupcakes. It should be quite thick at this stage so try not give in to the desire to add more milk.


5. Place an Oreo Cookie into each Cupcake case. Divide the batter between the 12 cases over the cookies. Bake for 18 minutes, or until a tooth pick or cupcake tester comes out clean. 


6. Allow to cool completely before attempting to frost.

7. For the frosting; In a bowl beat the butter for a minute or two. I normally do this by hand but feel free to use a handheld or stand mixer. Slowly add in the Icing sugar a little at a time and working through completely. 

8. Blitz the Oreo Cookies in a handheld blender until they resemble crumbs. Add the Oreo Crumbs into the Frosting and mix through. I normally chill the icing a little before frosting as it makes it easier to work with.  


9. Frost the Cupcakes using a piping bag or use a Tablespoon to place a generous amount on each then flick upwards to create a design. When frosted you can place an Oreo Cookie on top of each.
 

"People Are Like Oreos, The Good Stuff Is On The Inside"