Showing posts with label Gooey. Show all posts

Sunday, 20 October 2013

Walnut and Chocolate Chunk Brownies

Today I made Walnut and Milk Chocolate Chunk Brownies

This is one of my newer Brownie recipes and is quickly growing to be one of my favourites. These Brownies are packed full with Walnuts and large Chocolate Chunks. The mixture is a basic enough brownie recipe with a tonne of add-ins. Some people seem to have problems with Brownies, getting the texture right or getting the right consistency of the mixture or using too little or too much add-ins. The Walnuts not only add a great nutty flavour but also a fantastic texture. The slight crunch is a great contrast to the super soft and squishy texture of the brownie. These are best served warm not long out of the oven but can keep in an air tight container for 3-4 days, if they last in the house that long.


I don't use any Cocoa Powder in this recipe, all the gooey Chocolate-y goodness comes from the melted Chocolate. This keeps the recipe nice and light as there is only a small amount of flour involved. Some Brownies have a tendency to be very dense and stodgy or dry and flaky. These Brownies are rich, moist and packed full of Chocolate-y and nutty flavour. Melting the Butter and Chocolate together and beating the Eggs and Sugar together means there's more Liquid ingredients than Dry Ingredients, this allows the Brownies to stay super moist and just melt in your mouth. You can use any type of nut in this recipe: Hazelnuts, Peanuts or Pecans work well in this recipe also.


Ingredients:
(Makes 12)
  • 150g Butter
  • 2 Eggs
  • 100g Plain Flour
  • 1 Teaspoon Baking Powder
  • 170g Milk Chocolate
  • 150g Golden Sugar
  • 55g Walnuts
Instructions:

1. Preheat the oven 160°C. Lightly Oil a 20" square baking tray.  

2. In a large bowl whisk together the Eggs and the Golden Sugar until light and fluffy. It will start to look airy and will lighten in colour.


3. In another bowl melt the butter and 3/4 of the Chocolate in the microwave. I always use the microwave to melt Chocolate as if you do it on the oven you have to do it oven a pan of boiling water which gives off a lot of steam and during the melting process if any moisture gets into the Chocolate it could ruin the whole batch. 


4. Add the melted Butter and Chocolate into the Eggs and Sugar and mix fully. Then sift the Flour and Baking Powder into the Liquid Ingredients and mix till fully combined. 


5. Chop up the Walnuts and remaining Chocolate and add into the mixture. Stir the add-ins carefully. I normally hold back a small handful of the Walnuts for the top of the mixture.


6. Pour the mixture into your Oiled baking tray and smooth out the top to make sure it's even.  Sprinkle the remaining Walnuts on top of the mixture.


7. Place in the oven and bake for 20-25 minutes. You know the Brownies are baked when the top has set and a cake tester or toothpick comes out with few crumbs on it an not liquid. Leave to cool slightly and cut into 12 even pieces. I normally sprinkle some Icing Sugar on mine to finish.


"Forget Love... I'd Rather Fall In Chocolate"

Saturday, 12 October 2013

Cinnamon Rolls with Vanilla Glaze


Today I made super easy Cinnamon Rolls  

I have always had a weak spot for Cinnamon Rolls ever since I was a child.  My father would bring me in to town and we'd always have tea and share a Cinnamon Roll so to this day when I smell that sweet Cinnamon aroma it takes me right back to being that five year old girl. A number of years ago I started to notice that not many places sold Cinnamon Rolls anymore so I was faced with a dilemma - how was I going to get my fix now? So I started to look into making my own. The first couple of recipes I tried hit a miss, I was so familiar with how my memory wanted them to taste that I couldn't settle. I started playing around with putting together my own recipe and then one day everything fell into to place as I finally cracked it.


 Not only is this recipe really easy to make, they look like fluffy little spiraled pillows.  All nice & toasty and they just happen to taste amazing. These little guys are perfect for breakfast on a lazy Sunday morning, yummy Saturday brunch or naughty weekday afternoon tea. They come out of the oven hot, you load them with your frosting of choice, throw them on the table and everybody can tear off what they want. You can fill these rolls with Nuts, Jam, Nutella, Coconut or Mixed Fruit. I have a number different recipes that I will share with you .


Ingredients:

For The Rolls:
  • 350g All Purpose Flour
  • 3 Tablespoons Granulated Sugar
  • 7g Dried Yeast
  • 60mls Milk
  • 120mls Water
  • 40g Butter
  • 1 Large Egg
For The Filling:
  • 60g Unsalted Butter - softened to room temperature
  • 1 and 1/2 Tablespoons Ground Cinnamon
  • 100g Granulated Sugar

For The Glaze:
  • 150g Icing Sugar
  • 2 Teaspoons Vanilla Extract
  • 2 Tablespoons Milk

Instructions:

For The Dough:
1. Sift the Flour into a large bowl. Add in the sugar and yeast and mix until evenly dispersed. Set Aside while you prepare the wet ingredients.


2. Heat the water, milk and butter together in the microwave until the butter is melted, it normally takes me 40-50 seconds. Stir the butter mixtures into the flour mixtures. Add the Egg and bring together with your fingers until it forms a soft dough.


3. The dough is ready when it gently pulls away from the side of the bowl and starts to feel smooth and springy. 


4. On a lightly floured surface, knead the dough for about 4-5 minutes. Place in a lightly oiled bowl and leave to rest for 10 minutes. I do all my dough proofing  in my dryer - I know it sounds mad but I normally put on the dryer while I make the dough when the dough is ready I turn off the dryer and place the bowl into the dryer with a damp clean tea towel over it.


For The Filling:
5. After 10-15 minutes, roll the dough out into a 14x8 inch rectangle. Once rolled out spread the butter on top, mix together the Cinnamon and Sugar and sprinkle it all over the dough, right out to the edges.


6. Roll up the dough tightly. Cut into 12 even pieces, press down slightly on each swirl before placing into a a lightly oiled 9 inch round pan. I like to use a clasp release pans so its easy to get them out in one piece.


7. Loosely cover the rolls with cling film and allow to rise in a warm and dry place for an hour. After the rolls have doubled in size, preheat the oven to 190°C. Bake for 20-25 minutes until lightly golden brown. I normally cover the rolls with tin foil after 15 minutes of baking as I don't like them getting too brown. 


For The Glaze:
8. Mix the Icing Sugar with the Milk and Vanilla Extract, you don't want the the glaze too runny so it doesn't run right off the Cinnamon Rolls. Completely drench your Cinnamon Rolls with your Glaze and devour.


“Ask not what you can do for your country. Ask what’s for  breakfast.”

Sunday, 6 October 2013

Fererro Rocher Cupcakes with Nutella Frosting


Today I made Ferrero Rocher Cupcakes with Nutella Frosting


These cupcakes are definitely one of the most luscious and impressive looking out of the catalog of cupcakes I make. A fudge-y chocolate brownie cupcake and then the frosting, oh my the frosting - be still my little heart, smooth, creamy Nutella-y frosting - yes I said Nutella-y, it's so good I needed to create a new word for it. The cupcakes are then topped with Milk, White and Dark Chocolate Ferrero Rocher. The frosting I use in this recipe is the frosting recipe I normally used then I add in a healthy amount of Nutella and blended Hazelnuts. The frosting by itself taste so like Ferrero Rocher you wouldn't really need anything else but  because I'm a sucker for Cupcake toppers I just have to put a Ferrero Rocher on top of each Cupcake.


I like to talk about good food combinations a lot and this is definitely one of them. I use the key elements of Ferrero Rocher to really give the cupcake a Ferrero Rocher-y feel. The smooth Hazelnut center of the sweet is really easily replicated by Nutella, The crispy, nuttiness of the outside is replicated by the blitzed Hazelnuts in the frosting. I debated for a while whether to use a vanilla cupcake or chocolate cupcake for this creation. When I thought about how intense the top of the cupcake was I thought no point in holding back now and went for a brownie cupcake base. I also bake these little beauties in metallic gold cases so they look like the gold wrapping of the sweets.


Ingredients:  
(Makes 12)

For the Cupcakes:
  • 115g Unsalted Butter - Room Temperature
  • 170g Light Brown Sugar
  • 150g Cocoa Powder
  • 1 Tablespoon Vanilla Extract
  • 2 Large Eggs
  • 150g Plain Flour
  • 1/2 Teaspoon Baking Powder
  • 12 Ferrero Rocher
 
For the Frosting: 
  • 170g Unsalted Butter
  • 250g Icing Sugar
  • 150g Nutella
  • 100g Hazelnuts 


Instructions: 
 
1. Preheat the oven to 190°C and line the cupcake tin with your cases of choice. 
 
2. Put the butter into a microwave friendly bowl and heat for increments of 30 seconds until the butter is melted. Take out and stir in the sugar, put back in the microwave for a further 30 seconds and then stir again. 
 
3.  Add in the two eggs and Vanilla Extract and whisk till fully incorporated. At this stage you can sift in the Flour, Cocoa Powder and Baking Powder stir till just mixed - make sure not to over mix the cake batter.
 

4. Fill up the cupcake cases half an inch from the top. I normally use an ice-cream scooper as it gives the perfect amount to fill each of the cases.  


5. Bake the cupcakes for 12/15 minutes. Until a toothpick or cake tester comes out clean. Cool the cupcakes on a wire rack until fully cooled.


6.  For the frosting - place the Butter into a large bowl and whisk till it looks light in colour, add in the Icing Sugar and whisk till full incorporated. At this point you can whisk in the Nutella - (perfect spooning licking opportunity). 


7. Blitz the Hazelnuts in a handheld blender. Add into the frosting and mix through. When the cupcakes are cool you can then frost them. Fill an icing bag with the frosting and cut off the tip and frost each cupcake.


8. When all the cupcakes are frosted you can place a Ferrero Rocher on top of each one. These can be eaten straight away or you can chill them in the fridge for half an hour to firm up the frosting.


"Little Balls of Heaven - Ferrero Rocher"

Sunday, 29 September 2013

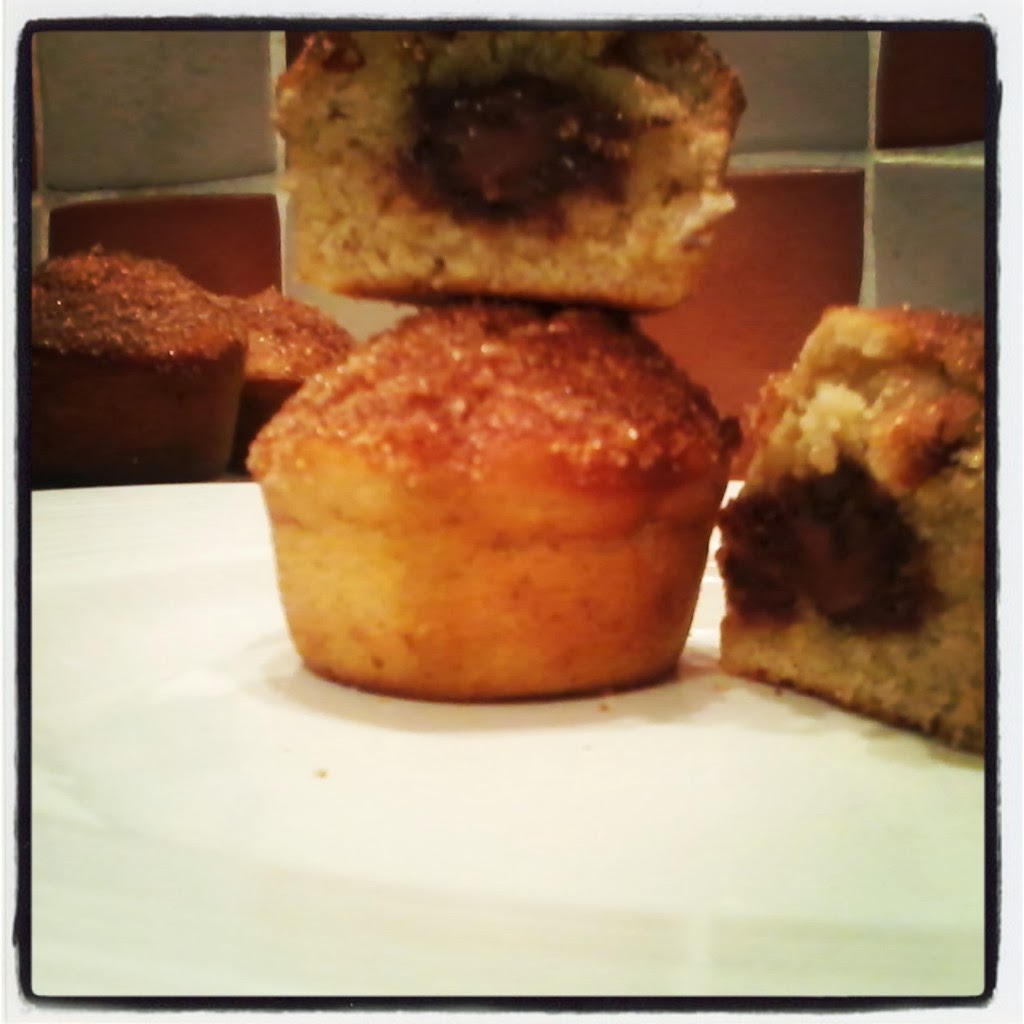
Nutella-Stuffed Sugar and Cinnamon Cupcakes

Today I made Nutella-Stuffed Sugar and Cinnamon Cupcakes


Do you love Doughnuts? Do you love Nutella? Do you love Cinnamon? Then you are going to love these. These little cakes taste like a cross between a doughnut and a cinnamon swirl. I used to make these cakes with just the sugar and cinnamon crust then one day I wanted to give them a quirky edge, that's where the Nutella came in. They are such a comforting treat with a cup of tea or cold glass of milk. Perfect for breakfast, as a dessert, as a lunchbox filler or as a naughty midnight snack. They are perfect for any occasion those all too well known chocolate/sugar cravings hit. Making these muffins is so easy. It only takes about 30 minutes from bowl to belly


.This is one of my favourite kind of recipes as all the ingredients are all mixed in one bowl. Any recipe that reduces the amount of dishes that have to be washed are favoured in my house. When you have these beauties waiting for you the last thing you want to do is face a sink full of dirty dishes. The texture of these cupcakes are so similar to that of a doughnut I often have people questioning are they really cupcakes. The Sugar and Cinnamon not only makes them look pretty but adds a crunch that really contrasts the softness of the cupcake.


Ingredients:
(Makes 6 large)

For The Cupcakes:
  • 80g Unsalted Butter, at room temperature
  • 100g Granulated Sugar
  • 1 Large Egg
  • 1 Teaspoon Vanilla Extract
  • 120mls Milk
  • 200g All Purpose Flour
  • 1 1/2 Teaspoons Baking Powder
  • 1/2 Teaspoon Cinnamon
  • 1/4 Teaspoon Nutella
  • 8 Teaspoons Nutella
For The Topping:
  • 1/4 Cup Granulated Sugar
  • 2 Teaspoons Cinnamon
  • 4 Tablespoons Melted Butter

Instructions:

1. Preheat the oven to  180°C. Spray muffin tin with an oil spray and set aside.

2. In a large bowl cream the butter and sugar together until light and fluffy. Mix in the Eggs,    Vanilla Extract and milk. Gently fold in the flour, baking powder, cinnamon and nutmeg.    Don't over mix, just stir together until everything is combined. 


3. Half fill each tin with the mixture. Layer with 1 tablespoon of Nutella in the center then top with another heaped teaspoon of batter on top. You can fill the cupcake tins right up to the top they won't overflow. I normally get 6 out of this mixture but can be easily doubled.


4. If you are using a 12 tin cupcake tin, I normally fill one of the empty tins with water to create some steam during cooking. This helps the cupcakes have really soft texture and even baking.

5. Bake at  180°C for five minutes. Reduce the oven to 160°C bake for a further 15 minutes until the cupcakes are golden brown. Allow to cool for five minutes.


6. While the cupcakes are cooling you can make the sugar cinnamon topping. Melt the butter in the microwave. In a separate small bowl stir together the sugar and cinnamon.


7. I normally use a pastry brush to brush the top of each cupcake with the melted butter then dip the top of each in the sugar and cinnamon mix. I normally swirl it around to ensure I get a nice thick coating.


“I love you like a fat kid loves cake!” 

Monday, 9 September 2013

Chewy Cranberry and White Chocolate Cookies


Today I made Cranberry and White Chocolate Cookies

These cookies like my "Chocolate Chip Cookies" are melt in the mouth. Having problems making your cookies super soft, thick and chewy is a thing of the past. The addition of Cornstarch to your cookies dough is the answer to all your Cookie Woes. Think about it, Cornstarch is often used to thicken sauces and soups, it only makes sense it would do the same to Cookies. The lack of high levels of Gluten will mean the texture of your cookies and cakes are much lighter. The most important thing about these cookies is the Baking Time. Take the cookies out of the oven after 8/9 minutes, I normally don't leave the kitchen while they are baking as one or two minutes over and the cookies will lose the texture you're looking for. The cookies will appear soft and underdone when you take them out but they will continue to cook for 3-4 minutes on the baking sheets. I normally leave them rest of the baking sheets for 8 minutes so they can firm up slightly and start to cool down before moving them to a wire wrack.


There are certain food combinations that are just meant to be and White Chocolate and Cranberries are definitely one of them. Those tangy little berries are truly the soul mates of sweet, creamy White Chocolate. It's a spin off of the typical Sweet'n'Sour combination that we are so familiar with. Each bite hits you with a zingy burst as you bite down on a Cranberry then you are soothed by the sweetness of the White Chocolate. White Chocolate is my favourite add-in to nearly all of my baked goods but especially in cookie Recipes. Cranberries not only add a great texture and flavour but also a burst of colour. I always think of Cranberries as the pretty sister in the dried fruit family. Ardkeen Quality Food Store have an impressive Dried fruit and Nuts section including dried Cranberries, Raisins, Sultanas, Crystalised Ginger and a wide variety of different nuts which feature a lot in my baking.


Ingredients:
(Makes 24) 
  • 170g Unsalted Butter
  • 150g Light Brown Sugar
  • 50g Granulated Sugar
  • 1 Large Egg - At room temperature
  • 2 Teaspoons Vanilla Essence 
  • 250g All purpose Flour
  • 2 Teaspoons Cornstarch
  • 1 Teaspoon Baking Soda
  • 100g Dried Cranberries
  • 100g Callebaut White Chocolate Chips
Instructions:

1. Preheat oven to 160°C. Line two baking trays with baking parchment or silicone baking 
mats.


2. In a large bowl cream the butter and sugars together, you can do this by hand with a spatula or whisk or with a hand held mixer until light and fluffy. Mix in the egg and vanilla and mix again.


3. Scrape down the sides of the bowl when needed. When the egg and vanilla are incorporated you can start to add in the flour, Cornstarch and Baking Soda. I normally put all the dry goods into a sieve together so everything gets incorporated evenly. 

4. Stir in the white chocolate chips and Cranberries. I normally add in half of each first and work that in before adding the remainder. Try to evenly disperse the White Chocolate and Cranberries so that every cookie will get little of everything. 


5. Chill the dough in the fridge for at least half an hour, the dough can also be chilled for up to three days in case you need to make it ahead of time. 


6. When the dough is chilled, take out of the fridge. Take up about 11/2 teaspoons of the cookie dough and roll into a ball in your hands. Place the balls of dough on the baking trays with a 1 inch gap in between them. Press down slightly on each to flatten the top and bottom. 


7. Bake for 8-9 minutes, until the cookies are just starting to go golden brown around the edges. I really recommend not cooking any longer than 9 minutes. Remove from the oven and leave to cool for 5-10 minutes, then transfer to a wire wrack.


"Chocolate Doesn't ask questions. Chocolate understands."