Thursday 19 December 2013

Five Festive Cocktails

Today I made Five Festive Cocktails

Everybody knows the festive season is about eating and drinking too much. So if you're going to do it, you might as well do it it style ;) I love having fun, fruity, festive cocktails at family get together's. I made a collection of my favourites including; Hot Whiskey, Cosmopolitan, Black Russian, Cherry Screwdriver and a Mojito. Each Cocktail fits a different purpose and event. Like a Hot Whiskey after a long day out in the Cold Christmas Shopping. A Cosmopolitan for catching up with the girls. A Black Russian is perfect for those after an alcohol/caffeine buzz. A Cherry Screwdriver for a playful way of getting one of your 5 a day and a Mojito for a refreshing and fancy after dinner drink.


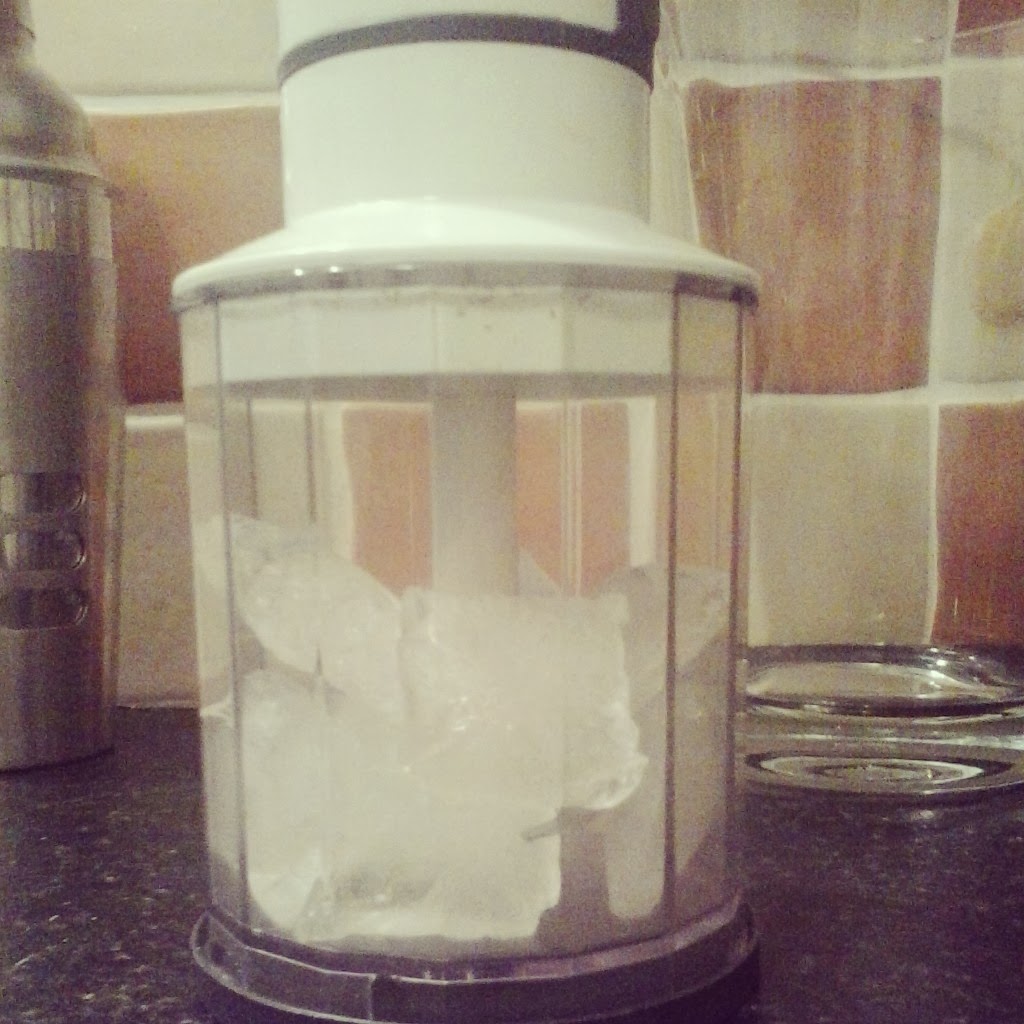
All good cocktails start with one vital ingredient.... Ice!! There are four different types of Ice. Cube, cracked, shaved and block/ball. Cubes are often used for basic mixing and shaking of drinks with juices or mixers. The larger the surface area of the cube, the slower it will melt, meaning less dilution of a drink - which is terribly important. Cracked ice is used for stirred cocktails. Crushed ice is  used in strong, stirred drinks like daiquiris. Block and ball ice are fairly large and melt slowly, so they're best used in punch bowls. Ball ice is basically a large block of ice that's been thrown into a special machine that rounds off the edges and turns it into a perfect sphere.

Ingredients:
(Makes 4 of Each)

For the Mojitos:
  • 250mls Vodka
  • 80mls "Wild About" Mint Syrup
  • Juice of 1 Lime
  • 140mls Club Soda
  • 16 Ice-Cubes - Crushed
  • 4 Wedges of Lime
Instructions:

1. Using a blender, crush the Ice and place into 4 Cocktail Glasses of choice, Filling right up to the top.


2. Fill a Cocktail shaker with Ice. Pour in Vodka, Mint Syrup and Lime Juice and shake vigorously - I love using Mint Syrup as I love the taste of Mojitos but I hate having the leaves in the glass as they always make their way up your straw at some point so this way you get the same great taste without the fear of eating leaves.

3. Pour mixture evenly into the four Cocktail glasses. Top each up with Club Soda. Place wedge of Lime on each glass to serve.


For the Cosmopolitans: 

  • 125mls Vodka
  • 125mls Gin
  • 2 Drops of Orange Extract
  • 80mls "Wild About" Raspberry Syrup
  • Juice of 1 Lime
  • 16 Ice-Cubes - Crushed
  • 4 Wedges of Lime
  • 4 Cherries
  • Icing Sugar - To dust
Instructions:

1. Dust the top of each glass with Icing Sugar. Using a blender, crush the Ice and place into 4 Cosmopolitan Glasses, Filling right up to the top.


2. Fill a Cocktail shaker with Ice. Pour in Vodka, Gin, Orange Extract, Raspberry Syrup and Lime Juice and shake vigorously.


3. Pour mixture evenly into the four Cocktail glasses.  Place wedge of Lime on each glass to serve.


For the Black Russians:
  • 125mls Vodka
  • 125mls Tia Maria
  • 60mls Chilled Coffee
  • 160mls Cola
  • 4 Wedges of Lemon - To Serve
Instructions: 

1. Fill a tall glass with Ice Cubes. Make a pot of percolated Coffee and leave to cool till chilled.


2. Fill a Cocktail Shaker with Ice. Pour in the Vodka, Tia Maria and Coffee and shake vigorously.

3. Pour into four tall glasses and top up with Cola. Finish the Cocktail with a wedge of Lemon. 


For the Cherry Screwdrivers:
  • 200mls Vodka
  • 200mls Orange Juice
  • 8 Cherries
  • 4 Wedges of Lime - To Serve
Instructions:

1. Place two Cherries into each Champagne Flute.

2. Pour 50mls of Vodka into each glass over the Cherries, the Cherries will flavour the Vodka. Pour the Orange Juice into the glass slowly so it stays on top of. 

3. Finish with a wedge of Lime on each glass.


For the Hot Whiskey:
  • 280mls Jameson Whiskey 
  • 400mls Boiling Water
  • 4 Teaspoons Honey
  • 4  Lemon Wedges 
  • 4 Cocktail Sticks
Instructions:

1. Place a Teaspoon of Honey into each Whiskey Glass. Add a small amount of Boiling Water and stir to dissolve the Honey.


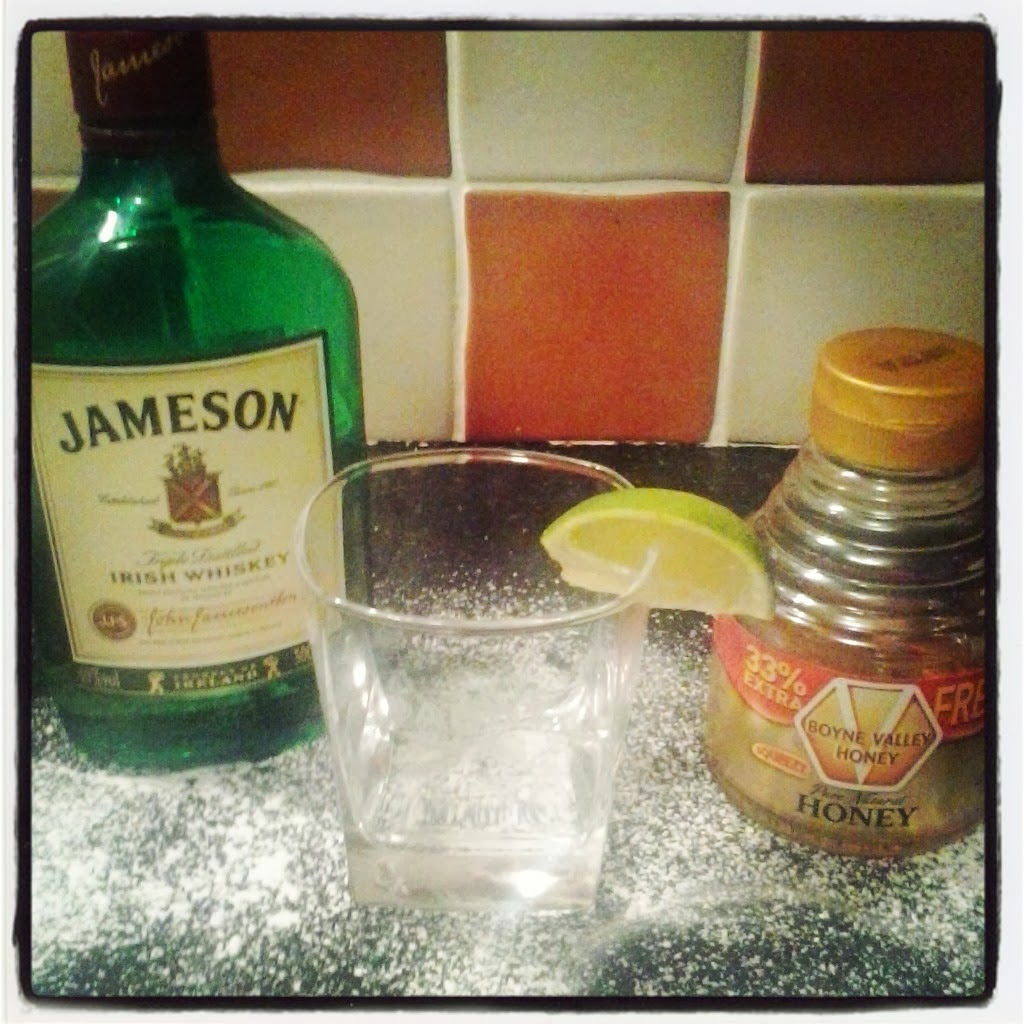
2. Add 70mls of Jameson to each Whiskey Glass and top up with Boiling Water while stirring continuously. 

3. Place the Cocktail Stick through the wedge of Lemon and place along the side of the Whiskey Glass - Which can be stirred through your drink as you drink.


"Take life with a grain of salt... a slice of lime, and a shot of tequila."

Thursday 12 December 2013

The Three Mince Pies

Today I made three different types of Mince Pies

After a few days your Mincemeat will have developed so much in flavour and will be just crying out to be used. Find the recipe for your homemade Christmas Mince Meat here. After a number of days or weeks in the fridge all the dried fruit will have taken on a lot of the liquid and plumped up. The sugar, citrus juice and the spices will have formed this amazing sauce. There is nothing worse than a dry Mince Pie. To save some time at this very busy time of year you can buy store bought pastry. Whenever I make pastry I always make it in bulk and freeze what ever I don't use. Pastry freezes really well, I normally take it out the night before I need to use it so it can thaw out in the fridge slowly. Then bring it to room temperature before use. 


Today I  have made three different types of Mince Pies. One batch made with Short Crust Pastry, one batch made with Puff Pastry and one batch of Mincemeat Crumbles. These act as perfect party finger food or as a part of a dessert platter. Unlike a lot of the store bought variations which are heavy and really filling these mini Mince Pies are gone in two or three bites. Short Crust Pastry is based on a "half-fat-to-flour" ratio. A mixture of Lard and Butter is rubbed into plain flour to create a loose mixture that is then bound using a small amount of ice water. Puff Pastry is a dough which is spread with fat and repeatedly folded and rolled out and a very tedious process.

Ingredients:
For the Mince Pies
350g Puff Pastry 
350g Short Crust Pastry
300g Mincemeat
1 Large Egg
Icing Sugar - For dusting

For the Crumble:
100g Flour
50g Ground Almond
75g Butter
30g Chopped Walnuts
20g Desiccated Coconut
50g Granulated Sugar

Instructions:
For the Short Crust Mince Pies

1. Preheat the oven to 160C. Roll out the Short Crust Pastry into a large rectangle. Stir the Mincemeat to distribute all the the flavours. 


2. Using a ridged cookie cutter, cut out 12 circles out of the dough. Place a disc into each hole of a shallow cupcake tin and press down the edges to mold the pastry into the edges of the tin.


3. Using a different shape and smaller cookie cutter, I like to use a small love heart, cut out 12 shapes and place them beside your cupcake tin. To be placed on top after filling.


4. Place a teaspoon and a half of your Homemade Mincemeat into each Pastry shell and press down slightly. Make sure to get a little bit of everything in each Pie.


5. Place the lid on each Mince Pie and press down slightly. I like for the lid to be slightly smaller than the Mince Pie itself for this variety as then you can see all the lovely Mincemeat peak out behind it.


6. Beat the Egg in a small bowl. Using a pastry brush, brush a little beaten Egg on the top of each Mince Pie lid. 


7. Bake in a preheated oven for 12-15 minutes or until golden brown. Dust with Icing Sugar to finish. Serve warm.


For the Mincemeat Crumbles:

7. Roll out the Puff Pastry and cut out 12 rounds  with the same cookie cutter as above. Place into the cupcake tin and shape. 


8. See step 4.


9. To make the Crumble. In a bowl mix the Flour and Ground Almonds, cut up the cold Butter into cubes and add into the Flour mixture. Rub the Butter into the Flour using your finger tips until the mixture resembles fine Breadcrumbs. Add in the Sugar, Chopped Walnuts and Coconut.


10. Place a heaped Tablespoon of the crumble mixture onto each Pie. Press down slightly to shape the Crumbles.


11. Bake in a preheated oven for 15-17 minutes or until Golden Brown. Finish with a dusting of Icing Sugar. 


For the Puff Pastry Mince Pies

12. Roll out the Puff Pastry and follow step 7 and 8. 


13. Cut out another disc for the top of these Mince Pies. Brush with beaten Egg before placing in the oven. Bake for 12-15 minutes or until golden brown. Serve with a dusting of Icing Sugar. 


"Season's Eatings"

Wednesday 11 December 2013

Lemon, Garlic and Rosemary Roasted Chicken

Today I made Lemon, Garlic and Rosemary Roasted Chicken

One of my favourite dinners of all time growing up was my mother;s Roast Chicken. There's something comforting and homely about a Roast Chicken dinner. Chicken is such a versatile meat and the meat I use most often when cooking. Nutritionally, it's a dream of an ingredient, being so high in Protein, Vitamin B6, Iron and Magnesium while also being low in fat and containing no Carbohydrates. Perfect If you are on a calorie controlled diet or spending a lot of time in the gym working on muscle tone. There are many ways to cook chicken as there are many ways to do Roast Chicken alike. I like to think of the skin of a Chicken as a flavour canvas and treat it as such.


My favourite flavour combination for my Roast Chicken just has to be Lemon, Garlic and Rosemary. Rosemary is high in Iron, Calcium and Vitamin B6 and has been known to improve memory along with having potent antioxidant properties. Garlic is very high in Vitamin C and Magnesium and has been quoted as one of the World's healthiest foods. It's been known to reduce the effect of cholesterol and promotes a healthy heart. Lemons are packed with Vitamin C which is important for a healthy immune system. The combination of the three flavours really mingle together well. Mixing the three ingredients in a small amount of butter and slathering it all over the chicken results in the most amazing flavour off your chicken.


Ingredients: 
  • 1 Large Free Range Chicken
  • 5 Cloves of Garlic
  • I Lemon
  • 2 Sprigs of Rosemary
  • 50g Butter
  • Pinch of Sea Salt
  • 2 Teaspoons OHCo Cajun Spice
  • 2 Teaspoons Olive Oil

Instructions: 

1. Preheat oven to 200C. Wash the chicken under cold running water. Pat dry with kitchen paper and place on a chopping board. Be careful when working with raw Chicken to prevent cross contamination, I recommend having a basin of hot soapy water in the sink so you can keep washing you hands as you go along. 

2. Place the 5 Cloves of Garlic into a pestle and mortar and crush slightly. Zest the Lemon and add into the Garlic, add in a pinch of Sea Salt and crush until the the Garlic cloves are broken down - The Sea Salt aids the abrasion of the Garlic and Lemon Zest, the Lemon Zest will release natural Oils and with that great lemony flavour.


3. Place the butter into a small dish, work the butter with a spoon to loosen it. Add in the Garlic and Lemon Zest and mix thoroughly. Pinch off the leaves off the Rosemary and add into the Butter and mix again. 


4. Prick the skin of the Chicken a number of time to allow it to crisp up along with allowing the flavours to penetrate into the Chicken. Make sure to cover every inch of the chicken not forgetting the wings and legs.


5. Add in a few springs of Rosemary and sprinkle on the Cajun Spice. This adds a great flavour along with adding to the colouring of the Chicken.


6. Line a baking tray with tin foil and drizzle with Olive Oil. Place the Chicken in the center of the baking tray. Cut the Lemon into quarters and place around the Chickens. 


7. Place into center of preheated oven for 45-60 minutes or until juices run clean when the leg is  pierced with a knife. When cooked take out of baking tray and place onto a chopping board and leave to rest for a few minutes before carving.


"I feel like Roast Chicken tonight"

Tuesday 10 December 2013

Christmas Mincemeat

Today I made Christmas Mincemeat


A Christmas favourite among my family has to be the ever festive Mince Pies and Apple and Mincemeat Crumble, well anything with the Christmas classic that is Mincemeat. Historically, Mincemeat always contained meat, then it branched into a meat and fruit combination but over the years it has developed itself into a purely sweet dish. To this day many modern recipes still contain beef suet. Although there are many boxed versions of store bough Mince Pies, nothing really beats a home-made Mince Pie. I have a number of different recipes in which I use Mincemeat, so I like to make it in bulk, jar it and store it to use over the Christmas period.


A clean sterilised jar is essential to the success and longevity of your Mincemeat. It is important to sterilise any jars used for preserves to remove any bacteria, yeasts or fungi to protect the food you put into the jar. To sterilise your jars heat the oven 130°C. Place the jars into the oven making sure they're not touching for a minimum of 20 minutes. Using thick oven gloves, remove from the oven and allow to cool slightly. Do not add cold food to hot jars or hot food to cold jars as this will cause the jars to shatter. This method will kill all bacteria and can be used for all preserves and once the mincemeat is in the jars it can last for up to six months. 


Ingredients: 

500g Sultanas
500g Currants
500g Raisins
250g Mixed Peal
100g Glacé Cherries
200g Granulated Sugar
80g Desiccated Coconut
60g Chopped Walnuts 
1 Lemon
1 Orange
1 Lime
4 Tablespoons Honey
2 Teaspoon Cinnamon
2 Teaspoon Nutmeg 
2 Teaspoon Mixed Spice
Instructions:

1. To Sterilise Jars -  Preheat oven to 130°C. Place Jars into oven for 20 minutes to ensure all bacteria is killed.

2. Place Raisins, Sultanas and Currants into a large mixing bowl and mix. Add in the Mixed Peal and mix. Roughly chop the Glacé Cherries and add into the mixture. 


3. Zest and  juice the Lemon, Lime and Orange. When zesting the citrus fruit ensure to stop when you reach the white pith as this layer is very bitter.


4. Add the zest of the fruit to the mixture and mix well. The zest adds a great freshness and zing to the mixture.


5. Add in the mixture of the Lemon, Orange and Lime juice to the bowl and mix thoroughly. The juice adds a great acidity which cuts through the sweetness. The juice is also absorbed by the dried fruit making them plump and packs a punch of flavour.


6. Add in the Granulated Sugar and stir through. The sugar will coat all the mixture and mix with the Fruit juice to form the "Sauce" of the Mincemeat.


7. Add in the spices and mix through. This is when the Mincemeat starts to smell like Christmas. If I could bottle that scent and carry it around with me for the month of December I would. 


8. Finally, add in the desiccated Coconut and chopped Walnuts. Although not typical Mincemeat ingredients they add great texture to the mixture along with another contrasting colour. 


9. Fill your jars right up to the top, pushing down slightly to ensure the mixture is packed. Place a small circle of parchment paper on top of the mixture within the jar and place the lid on the jars. The flavours will develop over the next two weeks and will keep for up to six months.


"All I want for Christmas is my two Mincemeat"